WP Super Cache is one of the most popular and the most efficient plugin for speeding up your WordPress website and to ease the load on your server. It has been downloaded more than 5 million times from the WordPress repository itself. The plugin offers many settings, and hence most people get confused and make wrong choices. As a result, the plugin does not efficiently does its job, which obviously is speeding up your website. This article will teach you about all the settings for WP Super Cache and there appropriate values.
What WP Super Cache Does
The plugin generates HTML files for all your posts, pages, tags, categories and all other pages the user can visit. The HTML files are generated from the PHP files from your WordPress theme and by querying the database. Because the generated HTML files are served to the visitors, there is no need to query the database again and again for the same page. To give the most up to date information and data, to the administrators and the logged in users, the plugin can also selectively show them non-cached pages.
Installing WP Super Cache
The plugin can be installed easily like any other plugin on WordPress. You can follow our guide for installing plugins on WordPress.
Setting Up WP Super Cache
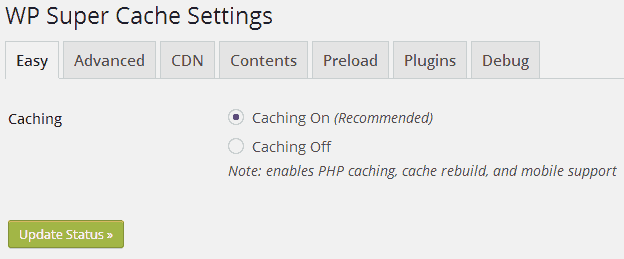
After activating the plugin, go to “Settings > WP Super Cache”. This will open the plugin’s settings page. From the top navigation, click the “Easy” button to reach the “Easy tab.
The Easy Tab
Your plugin is activated but the caching is not yet turned on. In the caching area, select the “Caching On” option and click the “Update Status” button. This will start the caching by the plugin. This is the only setting we need to do in this tab.

Advanced Settings For WP Super Cache
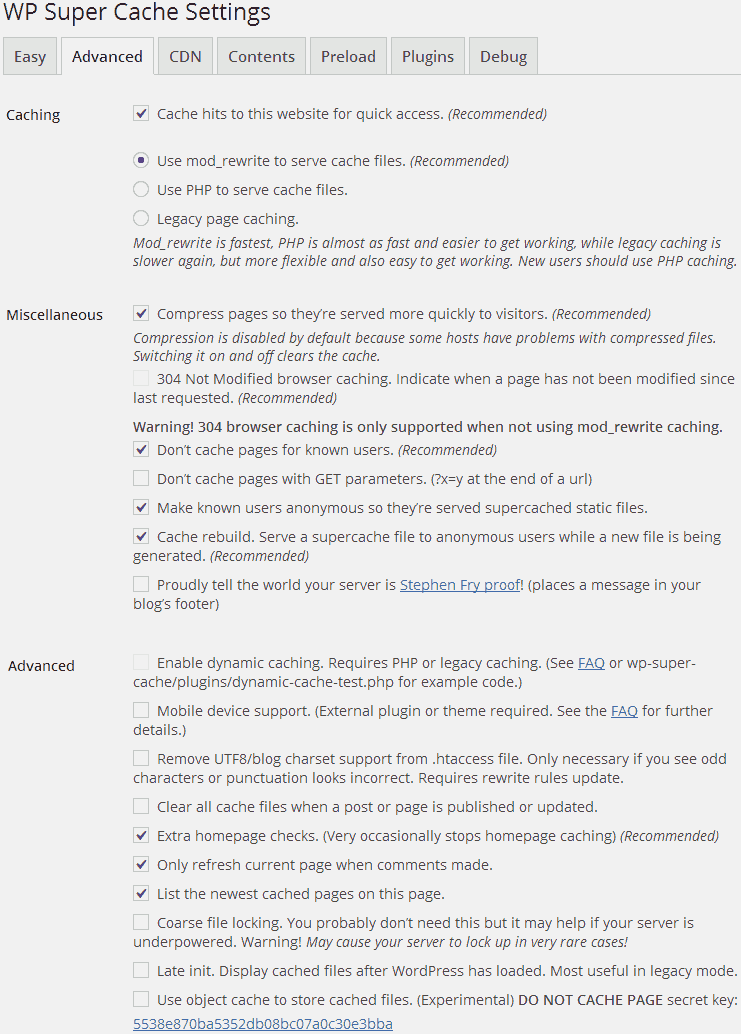
Select “Advanced” from the top navigation to get to the advanced settings of the plugin. All the settings you get on this page are explained below.
- Cache hits to this website for quick access: Enabling this option will cache pages when someone visits a page which is not already cached. The subsequent visitors will receive the cached page.
Types Of Caching
- Use mod_rewrite to serve cache files: This is the fastest among all the other options (according to the plugin author).
- Use PHP to serve cache files: This is slower than mod_rewrite but supports dynamic caching.
- Legacy page caching: This is slowest of all and also supports dynamic caching.
If you want to display certain parts of the page dynamically, then you should use PHP to serve cache files. Otherwise you should use mod_rewrite because it is the fastest.
- Compress pages so they’re served more quickly to visitors: This enables the compression of files. Compression decreases the load on your server and saves bandwidth. This also speeds up your website because smaller the resources, the faster they are transferred.
- 304 Not Modified browser caching: This option is not available when you enable mod_rewrite caching. This option lets browser know if the content on the specified URL has changed or not, after it was last accessed. If it has not changed, then the browser can fetch data from its own cache.
- Don’t cache pages for known users: This disables serving of cached files to the logged in users. This way, the logged in users will always see the up to date information on the website. Enabling this option is recommended.
- Don’t cache pages with GET parameters: People who know a little bit of PHP will know what a GET variable is. If you are using GET variables in your code, then you can decide if the URLs with the GET parameters be cached or not. For all the others, this option should not be selected.
- Make known users anonymous so they’re served supercached static files: When someone leaves a comment on your blog, they become a known user and are served non-cached files. If you enable this option, the known users will also receive the super cached files. The only drawback of enabling this is that once someone comments on your blog, they will again need to fill the Name and other details when commenting on your website. Since the probability of a user commenting more than once on your blog is very less, I will recommend this option to be turned on.
- Cache rebuild. Serve a super cache file to anonymous users while a new file is being generated: This option is self-explanatory and should be enabled for sure.
- Proudly tell the world your server is Stephen Fry Proof!: This will add a message in your blog’s footer with a link to the plugin author’s website.
- Enable Dynamic Caching: This option is not available in “mod_rewrite” caching. Enabling this option will let you serve some parts of the page without being cached. This is useful if you want to serve some data on the page with always up to date information. An example of this can be the views of the current page. Read FAQ to know how to setup dynamic caching.
- Mobile Device Support: This will enable support for mobile caching. But you will need an external plugin to do that. The best one is WP Touch.
- Remove UTF8/blog charset support from .htaccess file.: This option is for troubleshooting purpose and is necessary only if you see odd characters on your website.
- Clear all cache files when a post or page is published or updated: Enable this option if you want all the cache files to be deleted when a post is published/updated. Enabling this option can increase the load on your server.
- Extra homepage checks: The most viewed page on a website is homepage, usually. If you want your visitors to see the latest information on your homepage then enable this option.
- Only refresh current page when comments made: Enabling this option will make sure that the same page is not cached again and again even if it’s not updated. WP Super Cache will refresh the cache of a page only if new comments are made on the page.
- List the newest cached pages on this page: This is very helpful if you want to see the 10 recently cached pages. They appear at the bottom of the yellow box that appears at the right side of the WP Super Cache’s settings pages.
- Coarse File Locking: According to the plugin author – this will make the plugin create new cache files with temporary names. Therefore, there are very less chances of collision when new cache files are being created.
- Late init: Don’t know what it does. But I think it is related to displaying cached files to logged in users in WordPress dashboard. If you know about this feature, do let me know via comments.
- Use object cache to store cached files: This will allow the plugin to store cached files in a memcached backend rather than storing them to disk. For more information on this, you can visit this link.

Expiry Time And Garbage Collection
Garbage collector checks if a file is fresh or has expired. This is decided by what time you specify in the “Cache Timeout” section. I prefer a file to be fresh for at least a day. By this, a new cache file is created only after the old one expires.
Here you can select when you want your cache to be re-created. You get two ways here, either you can run the garbage collector at a specified time, or you can run it after every set interval. I prefer to run it once a day at 00:00 hours. Choose it to run when you expect least traffic on your website.
Using CDN With WP Super Cache
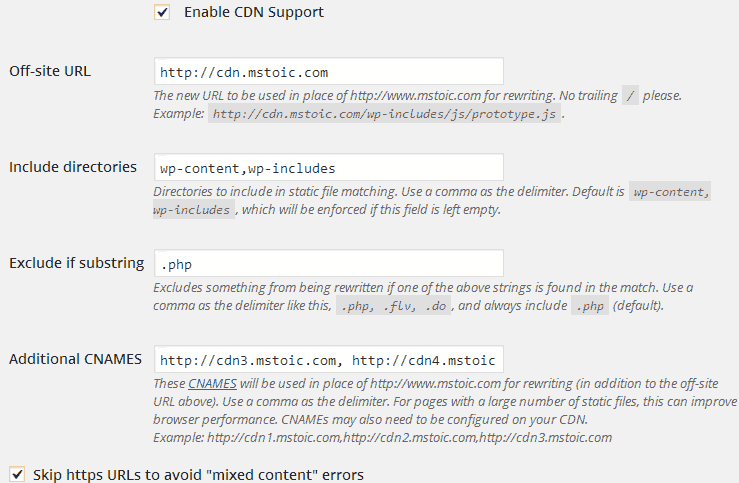
Click “CDN” in the top-navigation to navigate to the CDN settings. If you use any CDN service then you can tell WP Super Cache to take its benefit in this tab.

- First of all, enable CDN support.
- Now type the off-site URL. The off-site URL will be used instead of the regular URL to the original file. This URL needs to be configured in your DNS Zone File and on your CDN.
- Include directories: Here you can type the directories for which the URL will be re-written and CDN will be used.
- Exclude if substring: Anything that matches the substrings written here will not be re-written. PHP files should never be re-written, so including them is a must.
- Additional CNAMES: If your pages request many HTTP files, then you can add additional CNAMES. These CNAMES will be used in addition to the off-site URL you entered above.
- Skip https URLs to avoid “mixed content” errors: It is always a good idea to avoid rewriting of https files.
NOTE All the CNAMES (including off-site URL) you add to this page need to be configured in your ZONE file as well as at your CDN.
The Contents Tab
Here you can check how many cached files are stored by WP Super Cache.
- Cached Pages: Pages that are less older than the time specified in the Cache Timeout section in Advanced tab are listed as cached pages.
- Expired Pages: Pages that are older than the time specified in Cache Timeout. These pages will be re-created when some visits them.
You also get two options at the bottom of the page:
- Delete Expired: This will delete the expired pages from the cache.
- Delete Cache: This will empty all the cached files (both fresh and expired) from WP Super Cache.
The Preload Tab Of WP Super Cache
This tab allows you to generate cache files before even a user visits them. This is useful when you make a change to your website’s layout and you want everyone visiting your website to see the latest design. In this case, you can first delete the cache and then preload it from this menu.
You can also make WP Super Cache to refresh preloaded cached files after a set interval. I prefer not to refresh the cache until I change the layout of my website, and hence I set this time to 0 – to disable the refreshing of cache.
If you are on an underpowered server (shared hosting is considered underpowered), then you should not preload all the posts. You can choose the number of posts you want to preload from the drop down menu.
You also have some other options here. You can preload tags, categories and other taxonomies too. The plugin can also send you emails when the files are refreshed.
Finally the “Preload Cache Now” button can be used whenever you want to preload cache files. This can be run any number of times at free will.
The Plugins And Debug Tab
There are two other tabs that are only for advanced users. I will just give an overview for them.
Plugins
This tab allows you to enable WP Super Cache’s Support for plugins listed in this tab.
TIPThese plugins listed here need additional plugins to be installed or some files to be copied to the WP Super Cache’s folder. This is something only for advanced users and must not be touched without getting complete information.
Debug
This tab is only for debugging purposes. Use this only if you have the coding knowledge and you want to debug the plugin.
Deleting Cache For Individual Pages
There may be situations when you will want to delete cache of individual pages. WP Super Cache adds an option to the admin bar for this. The “Delete Cache” button appears on all the pages when you view your website as an Administrator. Clicking on it will purge the cache for that particular page only.
