WordPress automatically saves the changes you make to your post every 2 minutes and stores them as revision. For instance, if you take 1 hour to write your post then WordPress would have already saved 30 revisions of your post and stored all of them to your Database as separate entries. This will make the database drastically large and inefficient. But as usual we have a solution.
There are two approaches by which we can handle the auto saving in WordPress. Either we can alter the duration after which the autosave happens or we can disable it all together.
Changing the Autosave Duration
We can easily tell WordPress after how much duration you want the auto save to happen. If you like your work to be auto saved and you also want to take care of the database, then this is your best bet.
define('AUTOSAVE_INTERVAL', 600); // 600 is the duration in seconds
Add the above line of code in wp-config.php file in your WordPress installation folder. The above code will increase the auto save duration to 10 minutes, which will cut the database entries to one-fifth approximately.
NOTE You need to add this code everytime you update or reinstall WordPress. This is because wp-config.php is the WordPress’s core file and will be overwritten every time you install WordPress.
Turn OFF Autosave in WordPress Completely
Alternatively, if you write very long posts then you can disable the auto save feature completely. Just add the below code to your theme’s functions.php file between the opening and closing php tags.
function disableAutoSaveCompletely() {
wp_deregister_script('autosave');
}
add_action( 'wp_print_scripts', 'disableAutoSaveCompletely' );
The code is pretty straightforward. You are deregistering the script that does the auto save.
TIP You can manually make a post revision by clicking the “Save Draft” button. This will make a checkpoint, in case if there is a power failure you won’t loose the changes you made before the checkpoint.
NOTE WordPress does not completely disables the autosave feature. It will continue to make one revision when you click for a new post, but it will stop the auto save process when you are editing the post. That counts for only one revision for all the posts.
Deleting Earlier Post Revisions
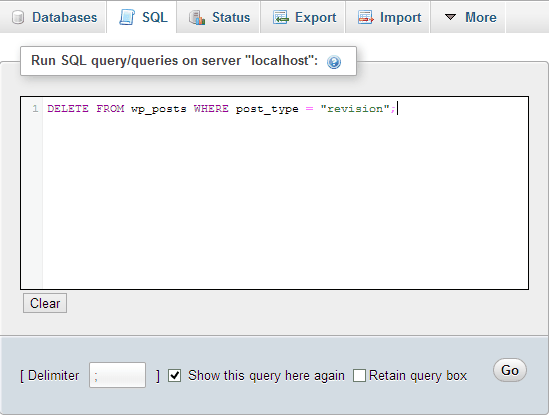
The methods above will limit the post revisions but not delete the earlier revisions WordPress created whatsoever. So to delete all the old post revisions you can go to phpMyAdmin and select your website’s database. Select “SQL” from the top navigation and run the following SQL query.
DELETE FROM wp_posts WHERE post_type = "revision";
TIP You can run this SQL query whenever you feel you have edited or created enough posts and you have accumulated enough post revisions in your WordPress database.

Limit Revisions and Reduce Database Size Using Plugins
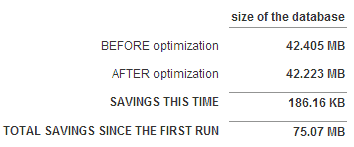
There is a plugin for everything in WordPress, and post revisions is no exception. Optimize Database after Deleting Revisions is one of the best I have ever used. It allows you to keep certain number of revisions for every post and page, optimizes your database with a single click, can delete spam comments and trashed posts and provides many other useful features too. If you don’t want to get your hands dirty by editing the code or running SQL queries, then this is the plugin you need to go for.

Link: Optimize Database after Deleting Revisions
