Earlier we talked about enabling two step verification for your Google account, which sends you a code on your mobile phone that needs to be entered to login to your Google account. This is done whenever you login from an unknown or a new browser.
If you have a website hosted with WordPress then you must consider securing it using the two step verification with Google Authenticator since sites powered by WordPress are under attack now a days. If you don’t think security is a major concern for you then read this article which describes how one of the author’s digital life was completely destroyed. In this article we will focus on making your WordPress blog more secure by installing two step verification using Google Authenticator for WordPress.
What is Google Authenticator
Google Authenticator is a software that generates a six digit number that is required to login to Google services and other third party applications. This code is required in addition to the username/email and password. This is an open source software developed by Google.What Google Authenticator Has to do With WordPress Security
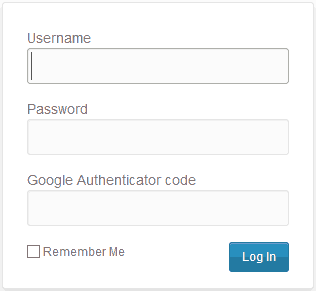
We will install Google Authenticator on our WordPress blog, this will enforce the user to enter a Google Authenticator generated code in addition to the username and the password to login to our blog’s Admin area, thus making it more secure. The code is not stored anywhere in the database and hence cannot be retrieved by unauthorized person. Moreover a new code is generated every minute ( until and unless you change the settings and increase the duration ) which makes it very secure and reliable.
The code will be generated by the Google Authenticator app that can be installed on almost any platform. Google itself provides an app for Android, iOS and Blackberry. Many third party implementations have been done on all other platforms listed here.
Setting Up Google Authenticator on WordPress
- Login to your Blog’s WordPress Admin area.
- Go to Plugins > Add new
- Search for “Google Authenticator” and install the plugin by “Henrik Schack”, usually comes first in the search results.
- Install the plugin.
- Now go to “Your Profile” placed under “Users” in the WordPress admin area.
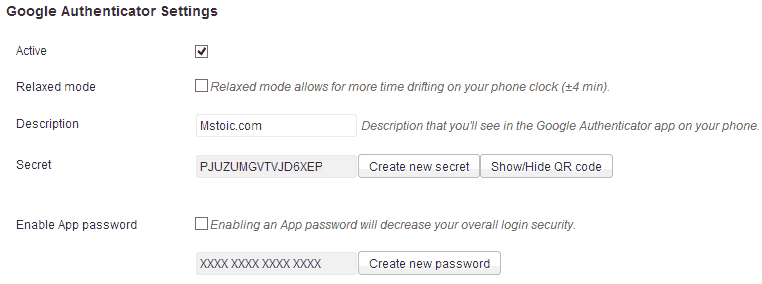
Explanation of the above figure
Active
This tells Google Authenticator to secure your blog. Checking this will enable the Google Authenticator for the current user.Relaxed Mode
Every code generated by Google Authenticator is valid only for a one minute duration. If you choose the relax mode then every code will be valid for five minutes. The code is just six digits in length and can be typed easily in a one minute duration. If you still want some more time then you can turn the relax mode on by checking the check box against “Relaxed Mode”.Description
The description acts as the account’s description in the Google Authenticator application. Give it any name. I used “Mstoic.com” for our blog.Secret and QR Code
This secret is the thing that generates all the codes for you. This secret is unique for every installation. If you ever let anyone know this secret, then that person can easily generate codes for your blog or anywhere you are using Google Authenticator.
QR Code is generated for easy transfer of this secret from one device to another, usually a Smartphone with a camera that can read QR codes. This QR code is used by us for generating codes on our mobile device. You can alternatively type the secret to generate the codes on your device.
Enable App password
This is required if you use remote publishing on your blog using Windows Live Writer or any other application that uses “XML-RPC”. Enabling this will decrease the WordPress security but if you are really fond of other applications for publishing content on your blog then you can enable this option and create an application password.Till here we are done with the setting of Google Authenticator app on WordPress and now we will install Google Authenticator on an Android device and generate unique codes.
NOTE If you have activated the Google Authenticator on WordPress then don’t logout from your admin area until and unless you start getting your unique codes.Setting up the Google Authenticator app on Android Device
- Go to the “Play Store” and search for “Google Authenticator”.
- Install it and then run it.
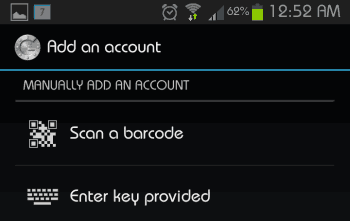
- It will prompt you to either scan a barcode or enter the key provided (secret). Now go to the Google Authenticator section in “your profile” in the WordPress admin area and either scan the barcode or type the Secret as shown in the input box. For scanning the barcode you need to first click on “Show/Hide QR code”, which will show the barcode. Your phone may also prompt you to download additional application that can read barcodes. Install it if required.
As soon as you do this the Google Authenticator app on your phone will start generating unique codes that will be required when you login to your Blog’s WordPress dashboard.
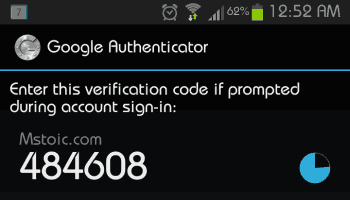
NOTE Make sure you have the secret copied somewhere safe, for when you misplace your phone, this code is the only way that can let you enter your WordPress admin area. These codes are generated without the help of data connection, which make using Google Authenticator with WordPress much easier.
Link : Google Authenticator for Android, iOS and BlackBerry
Link : Google Authenticator on other devices