WordPress has no native support for adding meta keywords, meta descriptions, the title for search engine and many other things that are essential for a web page’s SEO. For this reason many WP developers have made tons of great plugins to add these essential meta tags. But the most popular, and my personal favourite is the WordPress SEO by Yoast.
What is WordPress SEO By Yoast
WordPress SEO by Yoast is a WordPress plugin that can do a complete SEO of all the individual pages on your website, as well as your website as a whole. Search engines need some meta information to understand your content and to display it in the search results. WordPress SEO by Yoast makes it possible for you to fill this information for all the individual posts/pages and automatically adds it to the HTML of the document.
Installing And Using WordPress SEO By Yoast
The installation is similar to any other WordPress plugin. If you are beginner, then you can follow my guide to installing plugins on WordPress.
WordPress SEO by Yoast adds a meta-box on the post editor pages, page editor pages and the taxonomy pages. These meta-boxes allow us to add different types of information which can vary from page to page. WordPress SEO by Yoast has many other features too, like creating sitemaps for your website, adding Facebook open graph tags, adding data to RSS feeds, and many others. We will go through every feature in detail.
Doing SEO Of Individual Posts And Pages
WordPress SEO by Yoast makes it very easy to add unique meta information to each of our posts and pages. Besides that it gives you many other specific options too, like you can no-index individual pages, choose if you want to include the current post/page in your sitemap, and many other options that will make doing your website’s SEO very easy.
The General Tab
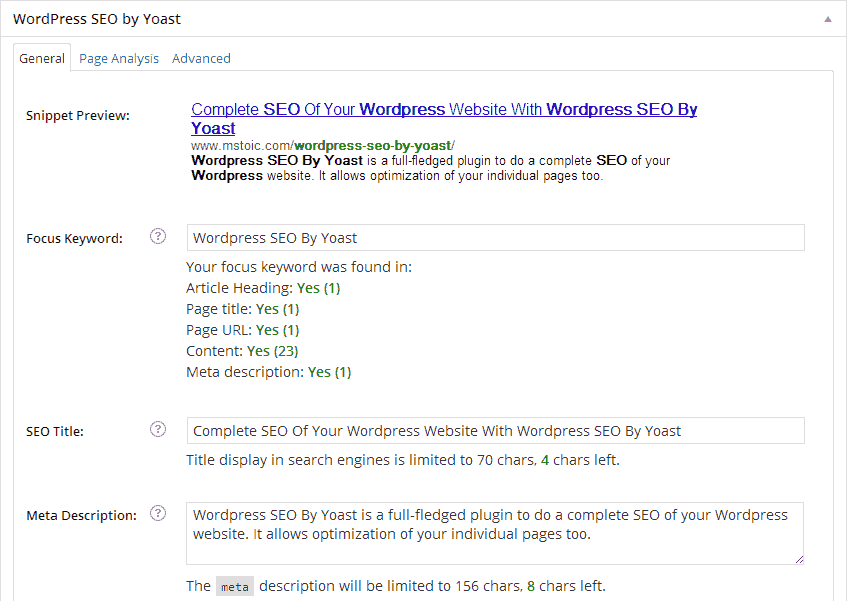
There are four tabs on the post/page editor page. We will take them one by one. First we will see the options in the General tab.
Explaining Meta Tags
WordPress SEO by Yoast allows you to add the two most important meta tags by default (the keywords meta tag can be turned on from the settings), the SEO title or the title meta tag, and the description meta tag. These are used by the search engines to rank your pages and to display them on the search engine result pages.
Why They Are Important
There are mainly three reasons I think they should be added to all your pages.
- Google gives much weight to these two meta tags while ranking your page on SERPs (Search Engine Result Pages). Giving a good and unique title and description tag can lend you a better place in search results.
- These are the only two things people will read before clicking on your website’s result and coming to your website. Make them as appealing and relevant as possible. These are the only things your site’s CTR (Click Through Rate) depends on.
- If you don’t add meta tags to your pages then search engines will automatically generate the description for them while showing them in the search results. This information they show may or may not be relevant to your page and may negatively impact the click through rate.
TIP Adding your focus keywords to these meta tags is a huge plus for SEO. If you are focusing on particular keywords, then there are no better places than these for adding your keywords.
The Third Meta Tag
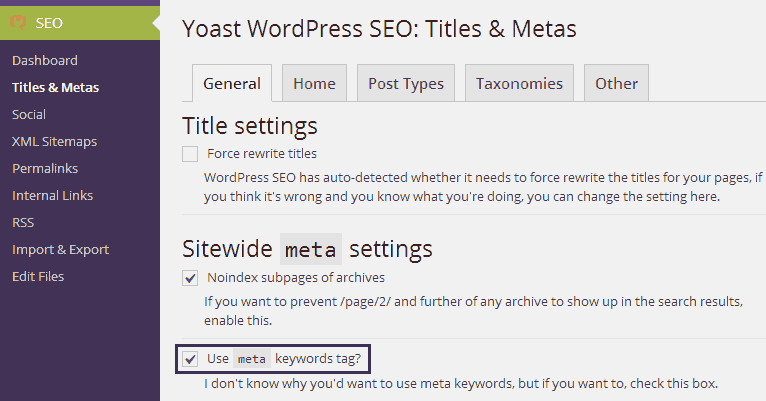
Search engines ones used one more meta tag in their algorithms, the keywords meta tag. But people started to misuse this meta tag and started stuffing it with loads of irrelevant keywords that were not at all related to the page content. Some people say that the search engines still use it, and some say they don’t. If you still want to use it, then you can go to “SEO > Titles & Metas” and select “Use meta keywords tag“.
Focus Keyword
This is a lesser used but quite powerful feature of WordPress SEO by Yoast. If you are writing a targeted article with a keyword to focus on, then this feature will help you in doing just that. As soon as you type your focus keyword, the plugin will tell you the places where you have included that keyword and the number of occurrences.
The key places suggested by WordPress SEO by Yoast for placing your focus keywords are:
- Article Heading
- Page Title
- Page URL
- Content
- Meta Description
The Page Analysis Tab
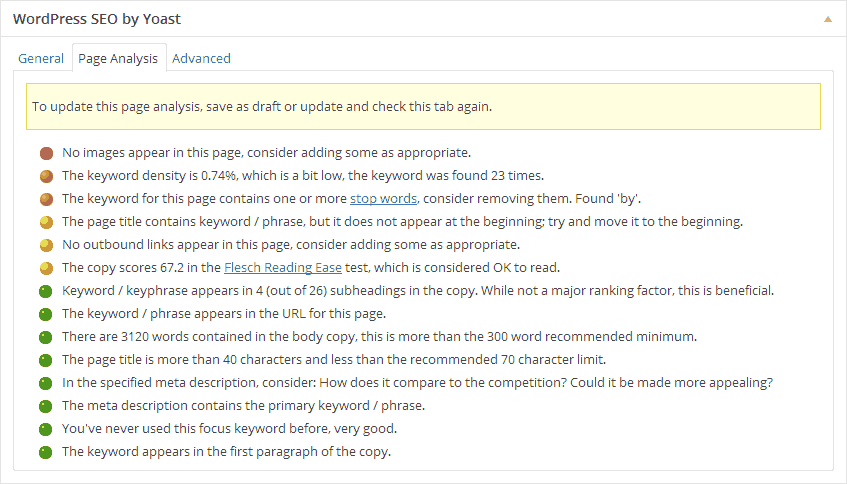
The function of focus keyword is not just this. The Page Analysis tab of WordPress SEO by Yoast shows recommendations based on your focus keyword. It gives a green, yellow and red rating to all the things you need to do to rank high in search engines for the given focus keyword.
Some of the common recommendations are:
- Have at least 300 words in your article.
- Always fill unique and appealing text in the meta description and meta title tags.
- Tells you about the presence of the focus keyword in the URL, the first paragraph, and the sub-heading tags.
- Warns you if the post/page title is less than the recommended length of 40 characters.
These are not all the recommendation WordPress SEO by Yoast has to offer. I just can’t list everything. You need to find out yourself by installing the plugin.
NOTEThe data in the “Page Analysis” tab is updated only when you save the draft or update your published post.
The Advanced Tab Of WordPress SEO By Yoast
As the name suggests, this tab is for “advanced” users and you must not play with it, unless you know what you are doing.
I will explain every option of this tab in detail. If you are a beginner then you can straight away jump to the Social Tab.
- Meta Robots Index: This tells the search engine if you would like this post to be indexed or not. This does not entirely mean that the search engines will not index it. It is with the search engine to adhere to this request. This has three options again:
- Default for post type: It leaves the indexing option of this post to be set globally.
- Index: Let search engines index this post.
- Noindex: Discourage the search engines from indexing it.
- Meta Robots Follow: This option allows you to tell the search engine if it should follow the links on the current page or not.
- Meta Robots Advanced: This option lets you prevent search engines from caching the page, showing the snippet in search results or from using the DMOZ description for your page. Different tags have different purposes.
- NO ODP: This tag prevents the search engines from displaying the DMOZ directory’s description of this page in their search results.
- NO YDR: This tag is only for Yahoo to stop it from using the description from Yahoo Directory for the current page in its search results.
- No Archive: This tag is to stop search engines from storing and displaying a cached copy of this page.
- No Snippet: This tag will prevent search engines (mainly Google) from showing a snippet for this page on SERPs and also prevent them from storing a cached copy.
- Include In Sitemap: Bloggers know what the power of submitting a sitemap is. This option allows you to selectively include this post in your sitemap, remove this post from the sitemap or let the plugin detect automatically from the global setting.
- Sitemap Priority: WordPress SEO by Yoast adds priority to posts while generating sitemaps. All posts can be given a priority from 0.1 to 1, where the latter is the highest. You can choose what priority you want to assign to the current post here. This priority is added to the sitemaps and search engines can use this to crawl pages with high priority more often.
- Include In HTML Sitemap: This tell WordPress SEO by Yoast if it should include the current post/page in the sitemap it generates. If left to “Auto Detect”, it will adhere to the global settings for all the posts/pages. Global settings are discussed later in the article.
Canonical URL: You can use this space (with caution) to input the URL you want to use wherever content of this page is shown.
Why Use Canonical URL
Suppose you have a page at “example.com“, may be your web server also display the same content of this page at “example.com/index.html“. But these are two different URLs for the search engine, and showing same content on two different URLs can lead to duplicate content issues. So using Canonical URL is advised, but, with caution.
301 Redirect: Adding a URL to this input box will redirect all visitors to this post to the URL you add here.
Why Use 301 Redirect
Suppose you wrote a new article about the same topic you wrote earlier. Now you want all the traffic and the page juice to flow from this (old article) to the new one. Then writing the new article’s URL in the old article’s 301 redirect column will redirect all visitors from old article to the new one. This will also prevent 404 errors on your website.
The Social Tab
The social tab can be of great use if you share your articles on social networking sites like Facebook and Google Plus. In this tab you can configure how your articles will look if you or anyone else share your articles on these two social networks.
You can configure three things here:
- Facebook description: Facebook by default fetches your page’s meta description when sharing your article on Facebook. If you want to show different description for sharing, you can add it here.
- Facebook image: Facebook automatically fetches the image for your article. If you want to force Facebook to use a particular image, you can add it here.
- Google+ description: Like the Facebook description, you can add a description to be used on Google Plus too.
WordPress SEO By Yoast For Your Website As A Whole
The above discussed things were limited for a particular post/page. But WordPress SEO by Yoast also gives you many other options (global) to configure and manage your website for a better SEO.
I will walk you through each setting individually to make the most out of the plugin.
1. Dashboard
Dashboard provides some very general options and functions. You can reach the Dashboard of WordPress SEO by Yoast by going to “SEO > Dashboard” from the WordPress dashboard.
- Introduction Tour: You can take a tour of WordPress SEO by Yoast and see some basic things you can do with the plugin. If you are using this plugin for the first time then taking this tour is strictly recommended.
- Tracking: This allows the plugin to send some of your website’s data to the plugin’s author. The data shared is the plugins and the themes you use on your website. This data helps the plugin author improve the plugin in a better way.
- Security: If you are an administrator of a multi-author blog then you will be safe by disabling the advanced part of the WordPress SEO meta box. Doing this will prevent Authors and Editors from redirecting and no-indexing posts and pages and many other things that can harm your website’s SEO.
- Webmaster Tools: This option allows you to verify authorship of your website with third-party services like Google Webmaster Tools, Bing Webmaster Tools and Alexa. You need to input the unique verification code they asked you to add to your homepage’s HTML and this plugin will automatically do that for you.
Recommended Read: Enhance Security of your WordPress blog with Google Authenticator
Titles and Metas
This area allows you to set global tags for all the different taxonomies, posts and pages. You can also set default tags for custom post types here. The templates you set here will be used for the titles by default for every page on your WordPress website.
One thing to keep in mind here is that you need to make the templates using variables. And all the variables are explained in the help tab, which can be opened by clicking the “Help” button in the top-right.
I will explain the Titles and Metas for Posts only. Configuration for all the other pages and taxonomies is exactly the same.
Choosing Templates For Posts
- Title template: This is the title template that will be used for all your posts. You can populate this field by getting variables from the Help menu.
- Meta description template: This is the template that will be used for generating meta description for all the posts.
- Meta Robots: Check this option if you want to make the posts no indexed by default and all the links on the page to be followed.
- Authorship: If you want to show your Google Plus image with your page’s result on Google, then uncheck this option. Checking it will remove the Google authorship tag from the HTML of your post pages.
- Date in Snippet Preview: Enabling this will let Google and other search engines show the date in the search snippet on the Search Engine Result Pages.
- WordPress SEO Meta Box: This will hide the meta-box on the post editor page. Enable this option only if you don’t want to use the WordPress SEO By Yoast for adding unique meta tags to your pages and if you are not writing any targeted post with focus keywords.
The Social Tab
The social tab allows you to add some data that is sometimes required when sharing your articles at social networking sites and to verify authorship.
The Facebook tab allows you to add the Open Graph meta data to your pages. With the Open Graph meta tags, Facebook can fetch the title, description and image for the page correctly. You can also set yourself as the Facebook Admin of your website and track data like shares, likes and impressions of the pages of your website on Facebook.
This page also allows you to set the image & the description that you want to use for the front page when it gets shared on the Facebook. A default image can also be set, which will be used when Facebook fails to find an image for the page being shared.
This tab allows you to add the Twitter Card meta data to your website’s <head> section.
Google+
Here you can manage the authorship for the homepage of your website. You can also add your Google Plus page (if you have one) and then you can link and verify your website from your Google Plus page.
XML Sitemaps
If you want to submit sitemaps to Google and/or other search engines, then you can enable XML sitemaps functionally in WordPress SEO by Yoast. WordPress SEO by Yoast will automatically update the sitemap when a post/page is published. It includes the author pages, attachment pages, posts, pages, and the taxonomies (tags, categories) by default. If you want to remove any type of pages from the sitemap WordPress SEO by Yoast generates, you can do that here.
At Mstoic, I only choose posts and pages to be added to the sitemap. This is to make sure that only the pages with the highest quality and the best content gets indexed.
If you are on Blogger, you can create Sitemaps too.
Permalinks
You can edit permalinks in this area. This is strictly for Advanced users and must not be touched before getting complete knowledge about the option you are playing with.
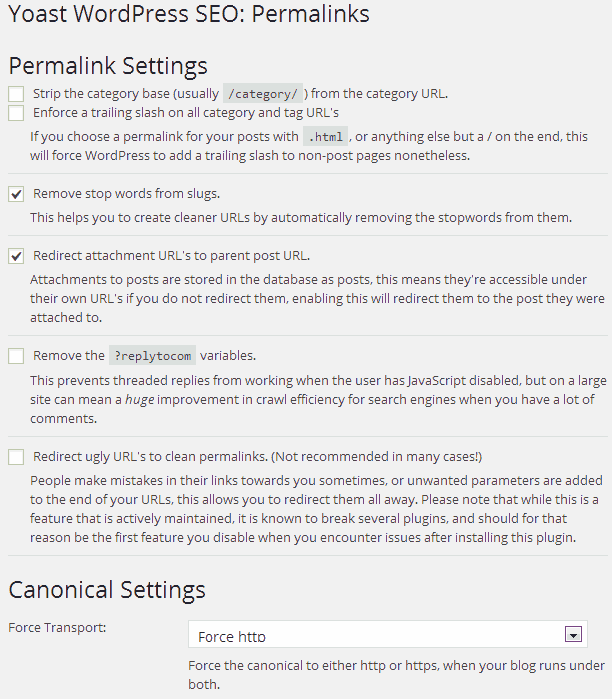
- Strip the category base: This will remove the category base “/category/” from the URLs pointing to the categories.
- Enforce a trailing slash on all category and tag URL’s: If you use “.html” or anything other than a trailing slash (/) at the end of the URL’s, then this option will force WordPress to add the trailing slash (/) at the end of category and tag URL’s.
- Remove stop words from slugs: If you want to keep only the useful keywords in your URL’s, then enabling this option will remove all the stop words from the slugs automatically.
- Redirect attachment URL’s to parent post URL: Every attachment you upload to WordPress can be accessed by a unique URL of its own. The pages at these URL’s are called attachment pages. You can redirect all the attachment pages to their parent post pages by enabling this option. This can also help in SEO by adding some more page juice to your post pages.
- Remove the “?reply to com” variables: The “?reply to com” variable is added for pagination of threaded comments. If your’s is a very large website, then you must enable this option. This can improve your website’s crawl rate hugely. This has a huge benefit for SEO too. Since the post data on all the reptocom pages is same, search engines can consider this as a form of duplicate content, and hence they should not be indexed.
- Redirect Ugly URL’s to clean permalinks: I actually don’t know if this feature is beneficial or not. It failed to work on my website and hence I can’t tell you what it actually does.
Canonical Settings
Force Transport: This is a great feature to prevent duplicate content in search engines. If your site runs with both https and http, then you can force the page’s canonical URL to either one.
Internal Links
This area lets you enable and configure breadcrumbs for your website. Breadcrumbs are shown on SERP’s in place of the URL. This is helpful because people can select individual category and tags from SERP’s itself.
You can also show breadcrumbs on your website. The method for inserting breadcrumbs into your theme is mentioned at the bottom of the internal links page.
RSS
You can add content before and after each post in the RSS feeds. This is helpful if people scrape content from your website. You can add links back to your website in the RSS feeds and search engines will know where the content originated from.
Import & Export
Import: This option lets you import data from other SEO plugins if you have used any. The plugin lets you import from Headspace2, All-in-one SEO plugin and WOOThemes SEO framework. It also allows you to import settings from other plugins by Yoast.
Export: The plugin allows you to export its own data and settings. This is useful incase you plan to re-install the plugin later, or you are installing the plugin on another website.
Edit Files
The plugin allows you to edit “Robots.txt” and “.htaccess” files from the WordPress dashboard itself.
NOTE Exercise caution while editing these files. Editing these files can break your website completely or remove your website from search engine altogether if not done in a right way.
LINK: WordPress SEO by Yoast

best SEO plugin ever