If you have made your own template or your own theme from scratch, then chances are that your website would be using all of the CSS, and there will be very less if any, that remains unused and needs to be removed. But if you downloaded a template or you are building upon one, then chances are that you would not be using most of the CSS that was being used by the original theme. So here is why and how you can remove unused CSS selectors from your style sheet.
Why Should You Remove Unused CSS?
Developers at Google recommend that you must remove the unused CSS and according to them the browser can render a web page only after it has parsed all the style sheets required by the page. The CSS may be external, internal or inline, no matter if its available in cache, it needs to be loaded before the rendering of the page can be initiated. After loading the style sheets, the CSS engine of the browser evaluates all the styles present in the style sheet to see which CSS rules are required by the content on the current web page.
So, removing unused CSS should be considered as a priority when you are serious about speeding up your website. Moreover, removing unused CSS decreases the size of your style sheet too, making it small in size and decreasing the time required by the browser to download it.
Remove Unused CSS in Chrome
Chrome is a great browser and have many inbuilt tools for web designers. If you want to remove unwanted CSS from your web site’s style sheet then it has a great auditing tool for that too.
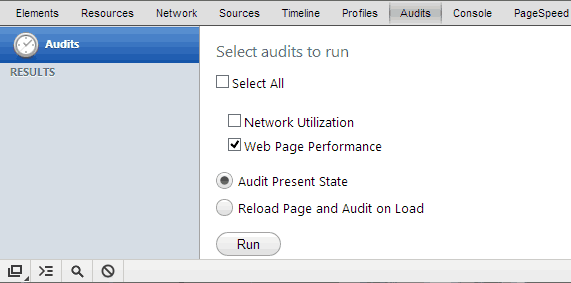
Just open your website, press the F12 key which will open the “Chrome Developer Tools” and go to the “Audits” tab. Now mark the “Audit Present State” and click on the “Run” button.

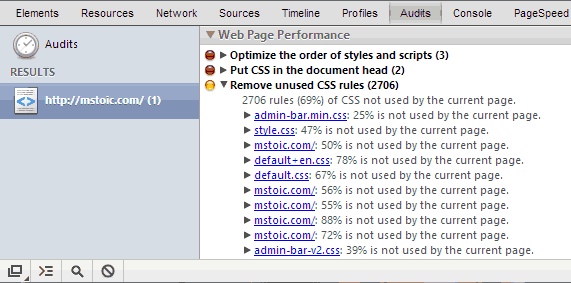
Once Chrome completes the analysis, it not only displays you the unused CSS but also gives many optimization tips, like if you have a CSS file that is loaded after the HTML, then it will alert you to change its order and to include it earlier.

The unused CSS is also arranged under the file name to which it belongs, along with the percentage of code from that file which is not used on the current page.
NOTE Remember that this will show you the unused CSS for the current page. The CSS may be required on other pages of your website. As a workaround, you can note the unused selectors for all the types of pages of your website, and then delete those which are unused on all the pages.
Removing Unused CSS Using The Online Tools : Unused CSS
Unused CSS is an online tool which when provided with a single or multiple URL(s), finds the CSS selectors that are not being used on those pages of your website and even creates a new CSS file removing all the unused CSS. But only the premium users can download the optimised CSS file and the free user can see only up to 100 lines of the optimized CSS file with the unused CSS removed.

LINK: Unused CSS
Remove Unused CSS in Firefox Using Dust-Me Selectors Plugin
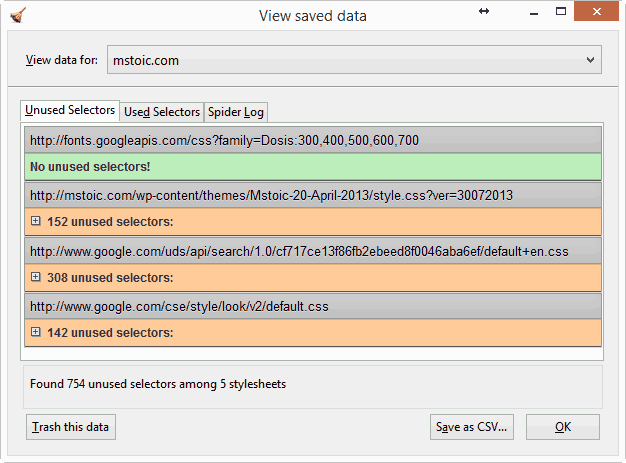
If you are a Firefox user then we have a solution for you too. There’s a Firefox extension called Dust-Me Selectors that goes way beyond the Google Chrome’s Audit tool. It fetches all the CSS selectors from all the CSS files from the current page, and then crosses all those which are not being used on the active page. When you visit subsequent pages of your website all those crossed selectors are again observed and the ones which are being used on the current page are uncrossed. You can visit every type of page in your website and then at last the plugin will give you the selectors which remain unused on all the pages.

Moreover, you can even submit your website’s sitemap, which will help Dust-Me Selectors to through all the pages of your website and give you only those CSS selectors which remain unused on all your pages.
LINK: Dust-Me Selectors Plugin for Firefox
NOTE I could not make it work on the latest version of Firefox. So I downgraded it to Firefox-10 and it worked like a charm. If it didn’t work on your version of Firefox too, then you can download the older version from here.
