Skip to content

Mstoic

  • Home
  • Start Here!
  • Best Deals
  • Facebook Tricks
  • Privacy
  • Resources
  • TOC
  • Tools
    • Web Tools
      • Stop Watch
      • QR Code Generator
      • Adsense Code Converter
      • Blogger Sitemap Generator
      • Difference Between Two Texts
      • Vacation Checklist
      • Twitter Symbols
      • Count Down
    • Investment
      • SIP Calculator
      • Power of Compounding
      • PPF Calculator
      • FD Calculator
  • About Us

Enable/Disable Delete Confirmation in Windows 8

Editorial Team | July 1, 2013July 1, 2013 | Tips, Windows, Windows 8 |
Windows-8

Windows 8 is full of new features, graphics and a completely different UI from the previous versions of Windows. It changed the way people use their computers. One feature that Microsoft disabled from Windows 8 was the delete confirmation dialog box. If you have upgraded to Windows 8 then you would have noticed that when you delete a file it automatically goes to Recycle Bin, without asking a confirmation for the deletion. This fills up the Recycle Bin unnecessarily with accidentally deleted files.


ALSO SEE : Top 5 Free Antivirus For Windows 8

But Microsoft did not remove the feature, it just disabled it and enabling the Windows 8 delete confirmation box is dead simple.


ALSO SEE : Get Start Menu Back in Windows 8 With Start8

How to Enable/Disable the Delete Confirmation Box in Windows 8

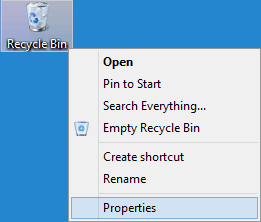
  1. Go to your Desktop and right-click on the Recycle Bin icon.
  2. Recycle-Bin-Properties
  3. Select Properties.
  4. Enable-Windows-8-Delete-Confirmation
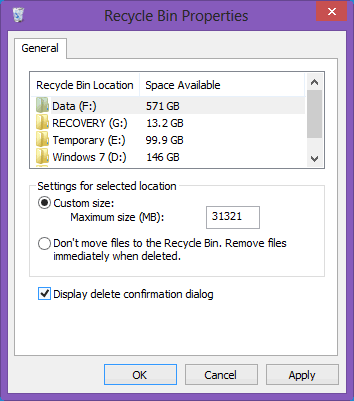
  5. Now just tick/untick the “Display delete confirmation dialog” option and click on “Apply”.

ALSO SEE : Download Windows 8 Trial For 90 Days For Free

That’s it. Now every time you delete something either by right clicking on the item and selecting Delete or by selecting the item and pressing the Delete button on your keyboard, Windows 8 will show the delete confirmation dialog box and relieves you from accidentally deleting files.
Verdict
I like it simple and don’t like the delete confirmation box bothering me again and again. But that’s my personal preference and I am used to it. You may like to confirm the action. So, here’s the easiest way.
Previous Post

How to Use VLC as a Video Converter Tool for Converting Video Files

by Editorial Team

Next Post

How to Stop Unexpected System Shutdown

by Editorial Team

Tags
  • Windows 8 Confirm Delete
  • Windows 8 Confirm File Delete
  • Windows 8 Delete Confirmation
  • Windows 8 Delete Without Confirmation
  • Windows 8 File Delete Confirmation
  • Windows 8 Prompt Before Delete
  • Windows Confirm Delete
Recommended Next
Restore Deleted Files In Dropbox

Discussions

  1. Gavin Wilson
    July 2, 2013 at 22:25

    Thank You for all the hard work, my windows 7 fan over heated and damaged too much to repair, so I had to use all my saving to get a laptop, but it came with windows 8. However I have lost photoshop CS6 and keygen. But thanks for sharing, it was fun when I had it, was just starting to get to grips. But now windows 8 doesn’t have a start button and I aint paying a 3rd company to give me one, so its hard to find things, wish I was more computer savy, anyways Ty

    Reply
    • Hemant Aggarwal
      July 2, 2013 at 23:07

      Try the free tool for getting Start Menu back

      http://mstoic.com/windows-8-start-menu-toggle-enable-disable-metro-ui-start-screen/

      Reply

Your Comment Cancel reply

Follow Us

Like us Follow us Follow us

Categories

  • Tricks (93)
  • Facebook (83)
  • Tips (76)
  • Windows (67)
  • Wordpress (39)
  • Android (38)
  • Internet (33)
  • Antivirus (30)
  • How To (29)
  • Webmasters (25)
  • Customization (25)
  • Downloads (21)
  • Utilities (21)
  • Gmail (20)
  • Windows 7 (19)

Related Articles

  • Reverse a String using StringBuilder