Skip to content

Mstoic

  • Home
  • Start Here!
  • Best Deals
  • Facebook Tricks
  • Privacy
  • Resources
  • TOC
  • Tools
    • Web Tools
      • Stop Watch
      • QR Code Generator
      • Adsense Code Converter
      • Blogger Sitemap Generator
      • Difference Between Two Texts
      • Vacation Checklist
      • Twitter Symbols
      • Count Down
    • Investment
      • SIP Calculator
      • Power of Compounding
      • PPF Calculator
      • FD Calculator
  • About Us

Setting Google DNS Server For a Faster Web Experience

Editorial Team | July 28, 2013July 28, 2013 | Google, Internet, Tips |
Speed

The Domain Name System or the DNS converts the domain names and the host name to their corresponding IP addresses. This is done because IP addresses are in the form of (x.x.x.x), where each x can have a value between 0-255, and hence are very difficult to remember. So DNS takes the pain of converting the easily memorable domain names to the IP addresses which the network understands.

ALSO SEE : Get Internet speed up to 1 Gbps with Google Fiber

Usually the DNS servers are set-up by network administrators or the ISPs, but there are many providers who have set-up free public DNS servers that can be used by anyone around the world, one of which is the Google Public DNS which provides the fastest web experience and side by side maintains reliability.

ALSO SEE : Convert Torrents To Direct Links And Download Them With IDM

Setting up Google DNS Server on Windows Machine

The screenshots and the steps are for Windows 8. They are almost the same in Windows 7 and Windows Vista. Users of earlier versions of Windows can face some difficulty, but the steps are almost the same, only the names may be different at some places.

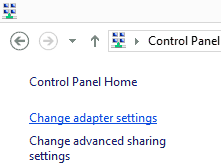
  1. Go to the “Control Panel” and select “Network and Sharing Center”. If you can’t find it, then at the top select the “Large icons” option in the “View by:” menu.
  2. Setting-up-Google-DNS-Control-Panel Large-icons-in-Control-Panel
  3. Now in the left hand pane click on “Change adapter settings”.
  4. Google-DNS-Change-Adapter-Settings
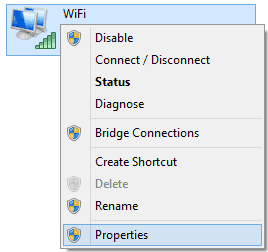
  5. Right click on the adapter you want to setup Google DNS Server on, and select “Properties” from the context menu.
  6. Adapter-Properties
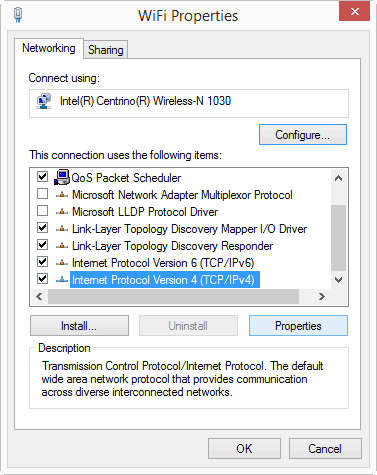
  7. Now select “Internet Protocol Version 4(TCP/IPv4)” and click on “Properties”.
  8. Open-IPv4-Properties-For-Google-DNS
  9. Now check the “Use the following DNS server addresses:” option and fill in the Google DNS server addresses given below.
    Preferred and Alternate DNS Google DNS Server Address
    Preferred DNS server 8.8.8.8
    Alternative DNS server 8.8.4.4
  10. Adding-the-Google-DNS-Server-Address
  11. If your network supports IPv6 then the Google DNS server addresses are as follows. These can be used by choosing the “Internet Protocol Version 6(TCP/IPv6)” in step 4.
    Preferred and Alternate DNS Google DNS Server Address
    Preferred DNS server 2001:4860:4860::8888
    Alternative DNS server 2001:4860:4860::8844
  12. Click OK and restart the adapter you chose in step 3.
  13. Restart your browser and experience a faster web with Google Public DNS.

TIP Repeat all the above steps for all the adapters you want to use Google DNS on.

LINK: Using Google DNS on other Operating Systems or Devices

ALSO SEE: Download IDM Optimizer and increase IDM download speed
VERDICT
Google DNS server has many advantages over the DNS server that is used by our ISP. This is because Google is working with the CDNs or Content Delivery Networks to serve you files from the server nearest to you. But if you use your ISP’s DNS server, it might not fetch files from the closest server.
Previous Post

31 Link Building Techniques That Still Work in 2013

by Editorial Team

Next Post

Get Your Classic Start Menu Back in Windows 8 With Start8

by Editorial Team

Tags
  • Change To Google DNS
  • Configure Google DNS
  • Google DNS
  • Google DNS Address
  • Google DNS Addresses
  • Google DNS IP
  • Google DNS IP Address
  • Google DNS Server Address
  • Google DNS Setting
  • Google DNS Settings
  • Set Up Google DNS
  • Setting Up Google DNS
  • Setup Google DNS
  • Using Google DNS
Recommended Next
How to Enable 2-Step Verification for Your Google Account

Your Comment Cancel reply

Follow Us

Like us Follow us Follow us

Categories

  • Tricks (93)
  • Facebook (83)
  • Tips (76)
  • Windows (67)
  • Wordpress (39)
  • Android (38)
  • Internet (33)
  • Antivirus (30)
  • How To (29)
  • Webmasters (25)
  • Customization (25)
  • Downloads (21)
  • Utilities (21)
  • Gmail (20)
  • Windows 7 (19)

Related Articles

  • Reverse a String using StringBuilder