There is always some data on our computer which we don’t want anyone to get their hands on. There are plenty of applications that can lock your folders and/or encrypt them, but most of them are paid and moreover, relying on a third-party app is not a good option. What if you could hide a complete drive and nobody could see or find it anywhere? Below is the tutorial to do just that.
Hide Drives In Windows Using CMD
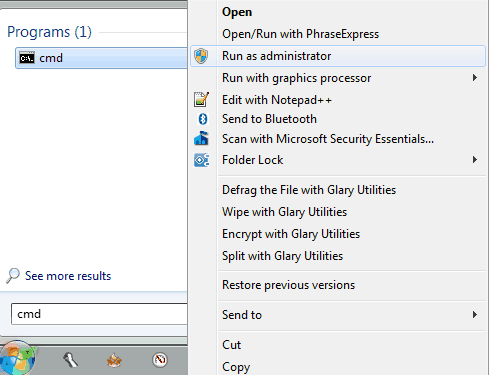
- Open Command Prompt as Administrator. This can be done by searching “cmd” in Start Menu search and then running it as Administrator.
- Now type “diskpart” inside “CMD” and hit “Enter”.
- Now type “list volume” and hit “Enter”. This will list all the disk drives on your computer.
- Now choose the volume you want to hide. Then type “select volume x” and hit Enter. Replace x with the volume number you want to hide. The volume numbers are written in the column “Volume ###”.
- Now type “remove letter y” and hit Enter. Replace y with the drive letter. The drive letter can be found in the “Ltr” column.
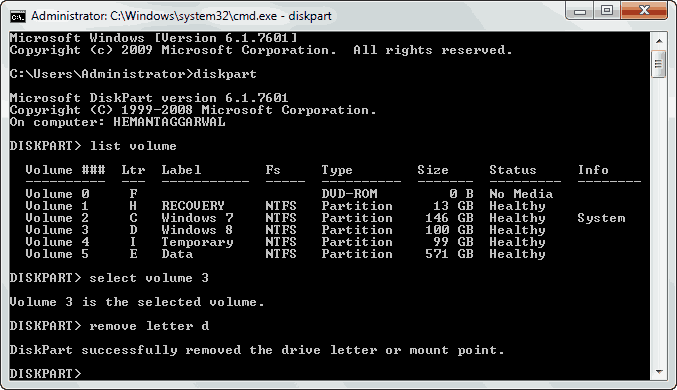
Your drive would be hidden till now. If it is still being displayed, then try restarting your PC.
Getting Back The Hidden Drive Using CMD
- Open CMD, type diskpart, then list volume, and then select volume x, as you did while hiding the drive.
- Now instead of typing “remove letter y”, you need to type “assign letter y” and hit the Enter key. Change y with the letter you want to assign to this drive. For security and integrity, type the same letter which was assigned to this drive earlier.
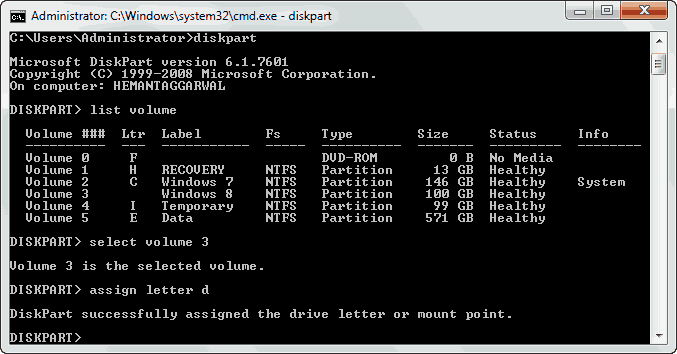
That’s it. You will start to see the drive in Windows Explorer as soon as you do this. If it’s not there, try restarting your PC.
NOTE DiskPart is a very powerful tool. If you mistype any command, you may lose your information or you might end up corrupting your Windows installation. Proceed with caution. We will not be responsible for anything that follows.